Friday, May 27, 2011

Compote Pincushion

A few months ago, I stumbled onto this picture over at Pinterest:


I loved the idea.  So very cute.  And I have a growing collection of decorative stick pins which come in handy for the linen pinboard that I made back in December. (Tutorial to come.)

So I decided to take some inspiration from this cute pincushion (in what I assume is a sweet little egg cup.)

My Mom and I went one weekend afternoon while she was visiting to a local thrift/antique store.  Within 5 minutes, I found a beautiful soft pink lidded compote.  I grabbed it.  But of course, I had to make sure I wasn't missing something better.  So we scoured the whole shop.  

There wasn't anything better suited for my project.

Isn't she lovely?


Granted, a little bit bigger than an egg cup...but I do have a lot of pins!
(You can see my pinboard in the background of the above picture.)

My next step was to find fabric.  And in my small town, that basically meant Hobby Lobby.  I picked three different patterns.  And once home, settled on a chocolate brown and soft pink damask.

I folded the fabric and stuck it in the compote to make sure I liked the total look.


So I began.

Materials needed:

Compote/egg cup/container for the base
Piece of fabric, size depends on your container. Mine was about 22x11 inches, folded into a square.
Square sheet of batting. (Mine was cut just slightly smaller than the fabric.)
Handful of loose Poly-Fil
Needle and thread and/or stick pins
Hot glue


1.  Lay fabric (cut to size) flat, right side facing down.  (Because of the thinness of my material, I folded it in half to make it more opaque. That's why the right side looks like it is up!)


2. Place sheet of batting over fabric and center Poly-fil on top.

3. Fold batting and fabric tightly over Poly-fil from top and bottom, to form a long rectangle.  Pin the fabric together and flip over carefully, so that you see the fabric on top.

4. If your fabric has a noticeable pattern repeat, choose the part you want centered in the "pillow." Then while taking care to keep the select spot centered, fold the open sides of the rectangle closed, to form a square.

5. Pin fabric closed and place in the compote to see the fit.  (below)


I found that it was a bit tedious to get all four sides with the same fullness, as evidenced above.  So, I fluffed and folded and fiddled with it until I was happy.
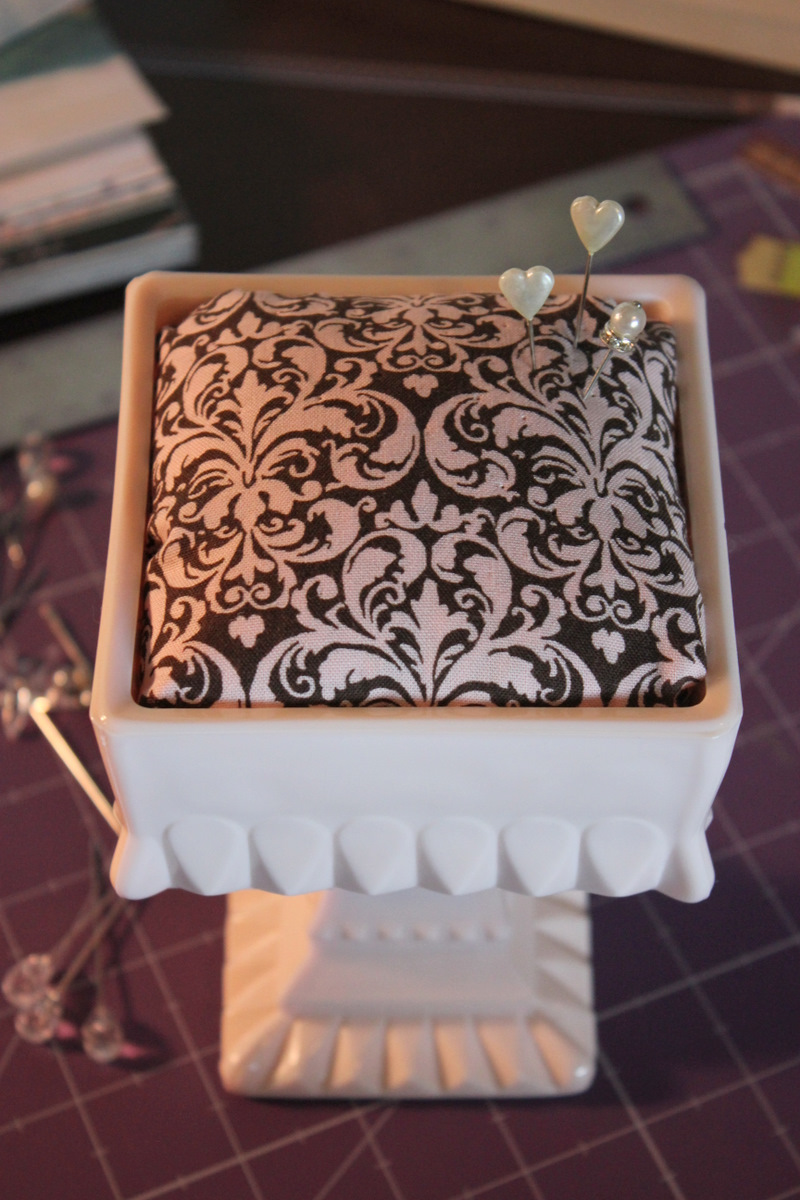

At this point, you could handstitch the fabric closed, if you so desire.  I found that my pins did a sufficient job holding it all together...and as naptime/quiet-time was over, the pins stayed put.  I love a project that doesn't necessitate needle and thread.  :)

Once the pillow is complete, you can use hot glue on the bottom and lower sides of the compote to make the pillow stay.  I found that with a square compote, the pillow was just slightly bigger than the opening, so it is securely "stuffed" in.  Additionally, I want the freedom to use the compote for other purposes (probably in the kitchen!) and wanted to ensure that I could go back and forth between uses easily.

I love pieces that multi-task!


If you have a round base for your pincushion, I recommend this tutorial.  And for more inspiration from the source of my inspiration pincushion, lookie here:  she has some other amazing pincushions and tons of great ideas on her blog!

Let me know if you try this out...I'd love to see your pictures!

Thursday, May 26, 2011

...ten...

Has it really been ten years?  

Since we walked down the aisle, hand in hand for the first time...husband and wife?

Nine...since we celebrated our first anniversary?
In Wilmington...and then France :)

Eight...since we counted down only 5 more months of just the two of us?

Seven...since we were just a family of three, realizing just how much we could love this little girl.
Falling in love again as we watched each other as parents.

Six...since we'd made our move to Texas...and looked forward to a baby boy. Wondered if it was possible to love another as much as we loved Hadleigh.

Five...happy...enjoying one another and our two little blessings.  Delighting in the difference between little girls and little boys. 

Four...anticipating another move, a new state, another sweet baby, building plans. Lots of changes on the horizon.

Three...since knowing our family was complete. Adjusting to a new stage of life. A new place in life.
(And thankful to be in our new home...finally...by our anniversary!)

Two...beginning the journey of homeschooling. Making date nights happen more frequently. Having fun together...just the two of us and as a family.

One...since our life in OK seemed more settled...and invested...and full. 

What a timeline.

So much has changed since that first day.
But then, so much is the same...and even better.

I love you, Brent. So very, very much.

Wednesday, May 25, 2011

Extra Special Breakfast

Crepes are a fairly normal breakfast option for our family on the weekends.  Brent (once again) is the crepe-maker of our family.  

For Mother's Day though, he went a little above our regular crepe recipe and fruit sauce to make these...and they were delicious.  I think the strawberry sauce (from step 4) is the extra special step here, as well as the fresh mint from our garden...I'll admit that I cleaned my plate, as did the rest of those sitting at our table.

And how gorgeous would these be for the 4th of July?  I'm thinking of renaming them Red, White, & Blue Crepes!

Strawberry & Blueberry Crepes

1/2 cup cold water
1/2 cup cold milk
2 eggs
1 cup flour
1/4 tsp. salt
2 Tbsp. butter, melted
8 oz. cream cheese, softened
1 cup sour cream
1/3 cup confectioner's sugar
1 cup fresh strawberries
1/4 cup sugar
2.5 cups lightly sweetened hulled strawberries and blueberries
whipped cream and fresh mint leaves for garnish

1.  Process the water, milk, eggs, flour, salt, and melted butter in a blender until smooth.  Chill for 2-3 hours.
2.  Heat a lightly oiled skillet or crepe pan.  Pour 3-4 tablespoons of batter into the pan.  Tilt the pan to form a 6-inch crepe.  Cook until light brown on the bottom and then remove to a wire rack to cool.  Repeat with remaining batter.
3.  Beat the cream cheese, sour cream, and confectioners sugar in a bowl with an electric mixer until smooth.
4.  Crush 1 cup strawberries with the 1/4 cup sugar in a bowl.  Stir until the sugar dissolves.
5.  Spoon 3-4 tablespoons of the cream cheese mixture onto each crepe.  Roll up and place seam side down in a baking pan.  Bake the filled crepes at 350 degrees for 5-7 minutes.
6.  To assemble, place 2 crepes on each plate. Spoon strawberry mixture over the crepes. Then sprinkle generously (about 1/2 cup each) with the strawberries and blueberries. Top with whipped cream and garnish with mint.

Serves 8.

Tuesday, May 24, 2011

More Projects on my Summer Fun List

via Pinterest, of course.

The kiddos would love this one...i'm thinking one side girly and the other side tough and boy-ish.

My college computer chair has had a very long life...and it's time.  TIme for a bit of a facelift. Now, I'm in search of the perfect fabric...

 via

This would keep the little ones entertained for at least an hour. (Note to self...buy more painters tape.)
 via

For any and all vacations, what a great idea!
 via

Oh boy.  This is going to be a hit.  And not just with the boy!
 via

How cute is this?  Right up Hadleigh's alley.
And if you don't want to make it, click through the link to see where you can purchase on etsy!

Any fun projects on your list you'd care to share? Please do!

Monday, May 23, 2011

Farewell Spring


I do believe that you are on your way, despite how much we would love to keep you around.

The warm temperatures have arrived.  The wading pool has come out.  Waterguns have been filled.  Schools in town close in the next week or so. The air condition is definitely on.

And you know, you could stay just a bit longer next year.  Say, until June 21. 

(Picture from a birthday luncheon I gave for a sweet friend.  Don't you just LOVE hyacinths?  They are so very fragrant and absolutely gorgeous. I was thrilled to find a local florist with some beautiful and reasonable blooms!)

Sunday, May 22, 2011

139 Roses

Two weeks ago (Mother's Day), I woke up to three sweet hand-deliveries in bed.  A cup of Earl Grey, a beautiful homemade card, and a sweet pink rosebud.

They told me to stay in bed until breakfast was ready (that recipe coming on Wednesday!)  And my, was it worth staying in bed for!

The centerpiece of the breakfast table had been created by my two oldest...baskets full of our knock-out roses. Gorgeous and oh-so-fragrant. (139 pink ones...by the way.)


It was a very special morning.  A very special day...with little sweet moments throughout...including a video from the children that I will forever treasure.

Every year, since Hadleigh was just 7 months old, I've taken a Mother's Day picture.  It's my only "requirement" of the day.  And Brent is always so sweet to make it happen. To the best of our ability.

Take one:


Someone is not happy about the sunshine.  (I understand. I have light blue eyes too. It hurts.)

So, take two:


I love this one...though we're dealing with the most-uncooperative subject ever. Oklahoma wind.  (On the bright side, we'll never forget where we lived the year this picture was taken!)

Take three:


And someone else was d.o.n.e. with taking pictures by this point.  And in need of a nap.  But the memory is captured.  And I love each one...though I did not find it quite as "memorable" at the time.

Some of the "outtakes" are priceless...maybe I'll share those later!

(Delayed Mother's Day post...due in part to some blogger schedule issues...and some "time to blog" scarcity issues...but thanks for reading a bit late. I wanted to have a record of it...mostly for me. :)

Wednesday, May 18, 2011

Asparagus

Also known as aspara-guts at our house. :)  But all kidding aside, asparagus gets a lot of cooktime at our house.

This is a delicious no-cook way to serve asparagus...and I've seen several versions of something similar in many locations this spring.  Brent made this a few weekends ago...and we all cleaned our plates! I have a similar vinaigrette recipe that I love (only with garlic added) that is delicious over a green salad...so if you want to make extra of the vinaigrette, it would be great to have on hand.

Shaved Asparagus with Parmesan Vinaigrette

12 large asparagus spears, trimmed and peeled
1/4 cup finely grated Parmesan cheese (plus a piece for shaving)
1.5 Tbsp. fresh lemon juice
1/4 cup extra-virgin olive oil
kosher salt and freshly ground pepper

1.  Use a vegetable to peeler to shave asparagus spears into long and thin slices. Transfer to a medium bowl. The tips will snap off as the spears get thinner, so add those to the bowl.

2. Combine the grated Parmesan and lemon juice in a small bowl and slowly whisk in oil until well-blended.  Season vinaigrette with salt and pepper, to taste.

3. Drizzle vinaigrette over shaved asparagus and toss to coat.  Divide salad among plates and use the peeler to shave more Parmesan over salad.

Wednesday, May 11, 2011

Mother's Day Meal

I had a very special Mother's Day...and I'll be back with details of the day tomorrow...but I had to share the delicious meal Brent cooked in my honor.

I am blessed to have a husband who also loves to cook...which means he often surprises me with breaks from the kitchen.  He loves trying new things...and I enjoy being the guinea pig!

He made several wonderful dishes, but today, I'll share the main course he created for dinner.  (The rest I'll share over the next few weeks!) He found the recipe on epicurious, and he used almonds instead of pistachios and olive oil instead of pistachio oil, as we had that on hand.

Salmon with Vegetables and Pistachio Pistou

1/3 cup chopped fresh dill
1/3 cup green onions, finely chopped (about 2)
1/2 cup shelled natural pistachios or almonds, toasted and finely chopped
1/4 cup plus 1.5 Tbsp. pistachio oil or extra virgin olive oil
2 yellow or orange peppers, cut into 1/2-inch strips
1 lb. sugar snap peas, trimmed with strings removed
1 garlic clove, minced
1/4 cup water
4 6-ounce salmon fillets

1.  Make pistou by mixing dill, green onions, almonds, and 1/4 cup oil in a medium bowl.  Season to taste with salt and pepper.  You can make this up to 2 hours ahead of time. Keep at room temperature.

2. Heat 1/2 Tbsp. of oil in a heavy large skillet over medium-high heat. Add peppers and saute until they begin to soften, about 2 minutes.  Add snap peas, garlic, and 1/4 cup water; sprinkle with salt.  Saute until the vegetables are just tender and the water evaporates, 2-3 minutes.  Stir in 1 Tbsp. of the pistou.  Place vegetables on a plate and tent with foil to keep warm.  Reserve skillet and do not clean.

3. Heat remaining 1 Tbsp. of oil in the skillet over medium-high heat.  Sprinkle salmon with salt and pepper.  Place salmon fillets, skin side down, in skillet; cook until skin is crisp, about 3 minutes. Turn salmon over and cook until almost opaque in center, about 3 minutes.

4. Divide vegetable among 4 plates and top with one salmon filet.  Spoon pistou down the center of each fillet to serve.

Tuesday, May 10, 2011

Summer Fun

Warm weather is upon us...and I'm turning to my Pinterest "For the Kiddos" board to make note of some fun activities I want to remember to try this summer.

Here are a few that I'm excited about right now...

I just love this...good to remember the simple joys of childhood.

 via
I have a feeling these will get a lot of use...and not only by my kids!

 via
My three love getting mail...and "making" mail for each other.  A few of these would help corral some of their "letters".

 via
I think it would be fun to have the kids help me with these...a project I've been wanting to tackle for awhile now!

 via
And they thought sidewalk chalk was fun!

 via
Hadleigh would love this idea for a handmade rug...

 via
A great idea...the fun of finger painting without the mess!

And while I know we won't be taking this on anytime soon...a sunken trampoline is a fabulous idea!

(Clicking on the links beneath each picture will take you to the Pinterest post...clicking on the pictures there will take you to the original source, often with directions/tutorials.)

What fun activities are you looking forward to this summer?

Thursday, May 05, 2011

a few pages for the albums...

Just thought I'd share a few scrapbook pages lately created...

Brent declared last Saturday "Outside Day" for the kiddos...they planted flowers, rode bikes, ran errands...while I got some quiet time {mostly} alone in the house to do a bit of cleaning and a bit of crafting.  It had been awhile and felt good...I used the Studio Calico April kit...which is full of fun colors and patterns!


I love the peek of Madeleine's diapers in the above picture...which inspired the reflective journaling. I'm looking forward to lots of picnics in the backyard again this summer!  It looks like the warmer days may actually be getting here and staying soon!


I just adore this picture of Madeleine...she loves to pick flowers.  (And doesn't quite understand why someone would not want to pick the flowers that they've planted in their pots!  We have many "Don't pick these flowers" conversations these days! But the fields behind our house are full of flowers for the picking...otherwise known to adults as weeds.)

Thanks for stopping by!
 

© 2011. All Rights Reserved. | Prefab Blog Design By Penny Lane Designs