Showing posts with label projects. Show all posts

Thursday, July 03, 2014

Independence Day Sponge Balls


In preparation for a dinner party we're hosting for friends for Independence Day tomorrow, the kids and I put together an old favorite summer project from several years ago.

If you're looking for a last minute 4th of July amusement to keep the kids (or adults) cool and having fun, this is the project for you! All you need are sponges, scissors, and dental floss. (You will want 2-3 sponges and 15 inches of floss per sponge ball.)

I was excited to find packages of red, white, and blue sponges at our local Dollar General. (I bought all they had!)


1. Cut each sponge lengthwise in half. Then cut each half lengthwise again, so that you have four equal pieces, as pictured above.


2. Divide your sponge pieces so that you have a variety of colors (if you wish) in each ball. I'd recommend anywhere from 6 to 12 pieces each. (Several years ago, we used 12 each. This year 6-7, as we needed to make more balls for the number of guests we will have.)


3. Cut a length of dental floss, about 15 inches long.  Take the sponges and grasp them tightly at the base, so that the midpoint of the sponges is just above your hand. Wrap the floss tightly around the center of the sponges 2 to 3 times, then tie securely.


4. You will then need to twist and "fluff" the sponge ball. Pictured above is what they look like after being tied (left) and after being fluffed (right). Gently pull the ends of each sponge towards each other and twist until the shape is rounded and full.


5. Repeat until you have completed all your sponge balls. Cut excess dental floss, about 1.5 inches from the knot. Soak balls in a bucket of water or kiddie pool and watch the fun begin!

Wednesday, October 23, 2013

Caramel Spiced Pumpkin Latte


One thing I love about the onset of October is the all-of-a-sudden-everything-pumpkin craze. To decorate. To eat. To drink.

I find that most people, when it comes to pumpkin-flavored food and drink, lie in one of two camps: 

Yum. or Yuck. 

I happen to love most all pumpkin things...and I do happen to like the phenomenon known as Pumpkin Spice Lattes. I have found that at my three local Starbucks locations, it's difficult to get a consistent drink...mainly seasonal beverages. I was elated to find that the Starbucks located in my grocery store has a manager who makes The. Best. PSL I have ever ordered. 

But...I also like to be conscious of spending, and so I began a search for a way to make them at home. There are a bunch of recipes out there...some are too pumpkiny...some are just gross...I began to get discouraged. I finally saw one (and now I can't remember which site it was from...I'll update when I find it) and knew it had to be The One. 

And it was.

With temperatures finally reminiscent of what the beginning of fall should look like, I made some of the syrup today...and then got the crazy idea to add another favorite fall flavor to make a latte: caramel.


Here's what I did:

Caramel Spiced Pumpkin Latte

1-2 Tbsp pumpkin spice syrup (recipe below)
1/4 cup hot brewed caramel-flavored coffee (I used The Fresh Market's Caramel Macchiato)
1/2 cup milk
pumpkin pie spice, for garnish

1. In a frother, (I have this one) pour 1/2 cup milk and heat for about 1 minute. Watch carefully to keep from boiling. Once heated, froth the milk until it doubles in volume.
2. In your favorite coffee mug, pour pumpkin spice syrup. I used close to 2 Tbsp. Pour coffee over syrup and fill the mug with the frothed milk. Stir gently.
3. Dust foam with pumpkin pie spice and enjoy!

Pumpkin Spice Syrup
yields about 2 cups

1 1/2 cups water
1 1/2 cups sugar
3-5 cinnamon sticks 
1 tsp ground nutmeg
1/2 tsp ground ginger
1/2 tsp ground cloves
3 - 3 1/2 Tbsp. pumpkin puree (NOT pumpkin pie filling)

1. In a small saucepan, combine water and sugar over medium-high heat. Stir occasionally until sugar is dissolved.  Add cinnamon sticks and remaining spices. Cook for 5 minutes; stir occasionally. Do not let mixture boil. 
2. Allow to cool for 15 minutes.
3. Using a fine sieve, strain all the syrup over a 4-cup measuring cup. Rinse the sieve. Place a funnel over storage bottle/container. Place sieve over the funnel and carefully pour the syrup through the sieve once more, taking care not to spill or splatter.
4. Store in refrigerator. 


I thought it would be fun to dress up my syrup.

I found this 16 oz. bottle with pour spout at my grocery store for a couple dollars.

To make the label, I took a small tag distressed with walnut ink (purchased years ago). 

I added a strip of Basic Grey's orange dotted vellum tape (similar here) around the bottom of the tag and stamped a pumpkin in the center with a brown Staz-on ink. 

To attach and finish the tag, I wrapped a piece of twine around the neck of the bottle twice, placed both ends of the twine through the tag and tied a bow.

This would a lovely gift...I'd use a 1/2 to 1 cup bottle to get more gifts out of each batch of syrup. Add a cute mug and bag of coffee beans with a recipe in a basket and you have a fabulous hostess or "just because" gift!

 ~ ~ ~ ~ ~
This is Day 23 of 31 Days: Crafting a Creative Life. You can find an archive of all the posts from this series here. Thanks for joining me this month!

Monday, October 07, 2013

Celebration Wreath


There's nothing like a celebration to get my creativity in high gear.

And with three birthdays within twelve days, October has plenty of celebrations in our family.


I love this balloon wreath I made a few years ago, after seeing several different styles of them. I decided to make one that would work for any celebration (boy or girl). I made sure that in addition to a mix of colors, there were plenty of pink, blue, and purple balloons, as those are the favorite colors of our kiddos.

This is really a simple project; it's perfect for working on with a movie in the background! All you'll need is:

a straw wreath, covered in plastic
several packs of greening pins
assortment of regular-sized balloons (you'll need a lot, depending on the size wreath form and the fullness desired.)
The process is pretty simple!

1.Take a greening pin.
2. Place the center of balloon (around the base of the rounded part under the crimped edge of the pin.
3. Position the pin on the wreath and press until the balloon and pin are tight against the wreath form.
4. Continue to pin balloons until the wreath reaches desired fullness. I did not put balloons on the back of my wreath, but you definitely could!
5. Hang on a wreath hanger or ribbon.


~ ~ ~ ~ ~
This is Day 7 of 31 Days: Crafting a Creative Life. You can find an archive of all the posts from this series here. Thanks for joining me this month!

Monday, December 24, 2012

Packages and Names...tied up with String!

When I saw the tutorial for twine-wrapped wire names on Pinterest, I knew that I wanted to use the idea for my embellishments for this year's brown paper packages! 


When I posted the above picture on Instagram, I had some questions about the process I used.

The tutorial featured on  Crafts Unleashed (which I followed) is really helpful...so I won't go into the full process, but just share some additional tips I found to be helpful.

Molding the wire into the names takes just a couple minutes. Wrapping the twine takes a while. I think it took me almost an entire two hour movie to finish Hadleigh's name from start to finish. 

Initials obviously are much quicker projects but still cute!


Cut more wire than you think you will need. I used about 20 inches for names with 4 or 5 letters. I used a little more than double that with Nathanael & Madeleine...and still came up a bit short with Madeleine. Looping letters like "e" and "l" don't take much wire, but letters like "a" "d" "m" and "n" have extra folds to make the letters form correctly and therefore require more wire per letter.

The above picture shows what the names or initials look like before stringing.

Leaving the letters with wider gaps helped me to wrap the twine more easily. If you compare the above picture to the one below, you can see how I tightened the wire after wrapping with the twine.


You can tighten the wire before wrapping, but it is more difficult to make the twine wrap smoothly in the creases.

On letters that overlap each other, like "L," "H," "G," and "K" I would recommend securing the point where the wire overlaps together with one wrap of twine AFTER you've wrapped all of the letter (up to to the overlap point). This way the letter does not stretch apart easily.


With the "T" above, I wrapped the twine up the left side of the "T", and halfway down the right side. Then I wrapped a small piece of wire to cross the "T," following the original tutorial's directions for wrapping it with twine. Once the cross-piece was covered in twine, I continued to wrap the bottom half of the "T."

And my last tip...double names. :) I used a really long piece of wire and started from the beginning. When I reached the "h" in Sarah, I spelled right to left with the wire for the second name, and I actually found this to be much easier than working from left to right.  I left a little extra between names so that I could center "Kate" underneath "Sarah," knowing that I could always make the loop after the "h" a little bigger or smaller.

I think these would make adorable ornaments or cute decorative pieces to hang in a child's room!

If you have any questions, please ask in the comments, and I will add my responses there!

Monday, October 15, 2012

Day 15 of 31: Re-imagine


Sometimes what worked perfectly in a previous home just doesn't work technically in a new home.

A few years ago, I made two linen pin boards...one as an inspiration board in my creative space and another for hanging necklaces in my closet.


Our old closet had built in shelving, and I cut the pin board to size in order to fit it tightly in place in the back of one of the shelves. In front of it stood my jewelry box, so it was quite convenient for getting ready in the morning.

Our house here has only a bit of wire shelving above the clothes rods...so I was at a loss on how and where to place my necklace board...and as a result, the beginning of the summer I spent necklace-less. Out of sight, out of mind.

I thought I'd share today an easy DIY project for the linen pin boards and show you my jewelry board with its location re-imagined, hanging like a picture on our closet wall.


You'll need:

1 sheet of foamcore, cut to desired size
enough linen or other fabric to cover the foamcore
batting by the yard, again to cover foamcore
regular stapler
decorative stick pins, I love these by Maya Road
ribbon for hanging
scissors
needle & thread

1. Unroll batting and place the foamcore in the center, with enough batting on each edge to fold over onto the back. Open the stapler (as you would if you were stapling a bulletin board) and staple the batting into the foam core about two inches from each edge, spacing staples a few inches apart, or as needed to prevent gapping of the batting. Trim excess batting about 3/4 of an inch from the staples.

2. Using the same technique as with the batting, place the covered board batting-side down on top of your fabric. Fold fabric around the board and allow fabric to extend beyond the stapled batting on the back.  Pull fabric taut and staple the fabric into the foamcore. You may need to occasionally staple the fabric and batting areas.

I stapled the long sides of the boards first, then the short sides. Try to eliminate any unnecessary batting and fabric in the corners, so that the back of the board can lay as flat as possible.

3. At this point, if you're placing the pinboard in between shelves, you're done! Put some pins in (at an angle) and hang your jewelry!


In our new closet, there is about four feet of space between our door and a window on the wall adjacent to the closet door. I decided that it was the best location for the pinboard.

I found a wide, sage-colored grosgrain ribbbon in my ribbon collection and stitched each end of the ribbon to the fabric on the back of the board. There was already a nail in the wall at the perfect height, so I folded the center of the ribbon twice (so the ribbon would be supported well and so it would hang nicely) and placed it over the nail.

It still looked unfinished, so I took each end of the ribbon and made a loose knot right above the board and then tucked the ends of the ribbon into the fold of fabric.

I'll be honest...I prefer my board tucked into my old shelves...it had a built-in look to it. But in this home, a slightly-less perfect spot still offers a solution for my necklace storage.

What do you have that needs to be re-imagined?


~This is Day 15 of 31 Days. You can find all posts in the series here 31 Days of Making this House our Home.

Monday, January 23, 2012

Finished!


Remember this?


I finished it a little over a week ago.  It was a fun project to work on...and I'm so excited that I finished it so soon after December. Usually it takes me so much longer.

I'm still planning on adding something to the binder rings to soften them a bit...but I loved using this vintage book and Marcy Penner's kit.  Having a good number of prebuilt pages really helped me stay on top of this project.

I thought I'd share a couple of favorite pages :)


December 1: Christmas coffee


December 3: Nathanael's belated birthday party :)


December 6: First snow day


December 12: new Christmas cd


December 16: My kiddos meet The Muppets :) (There's an inside theatre pic and journaling under the muppet picture.)


December 20: Christmas crafts and special gifts from family


(a close up of that little pocket)


Christmas Day :)


December 28: ordinary, wonderful days


New Year's Eve: love that I captured that laugh.

Glad this is done...but I'll be excited to begin again in December!

Wednesday, December 21, 2011

Create with Joy!


I just love crafting around Christmas...I love that my children really enjoy creating.  It's so much fun to introduce projects to them and see them get so excited about the things that they make.

I love it just as much as they do, and just in case you do too, I thought I'd share this project I worked on a few weeks ago.  It's easy, inexpensive, and I just love how it turned out!


I fell in love with this sweet illustration back in November, when I took home a cozy sweater from Eddie Bauer.  It's a good reminder to pay attention around Christmastime to packaging...this fun Christmas print came from a cute shopping bag!

I didn't have the heart to throw away the bag, so I saved it and decided to use it for decoration!


(The best thing about it? It's double-sided!)


You'll need a print design, canvases in an appropriate size for the design, scissors, craft knife, mod-podge, a glue pen, fine glitter, and Superseal.

First, cut apart the bag so that the design is flat. Place the canvas behind the print, holding it up to the light (or a lightbox) to choose the best placement. Then, trace around the canvas on the back of the print.

Cover the back of the print with mod-podge, painting inside the area you've traced. Carefully place the canvas over the mod-podge, pressing gently to adhere the paper to the canvas. Carefully smooth out any bubbles or creases in the paper. I found the heavier the coverage of mod-podge, the more creases.


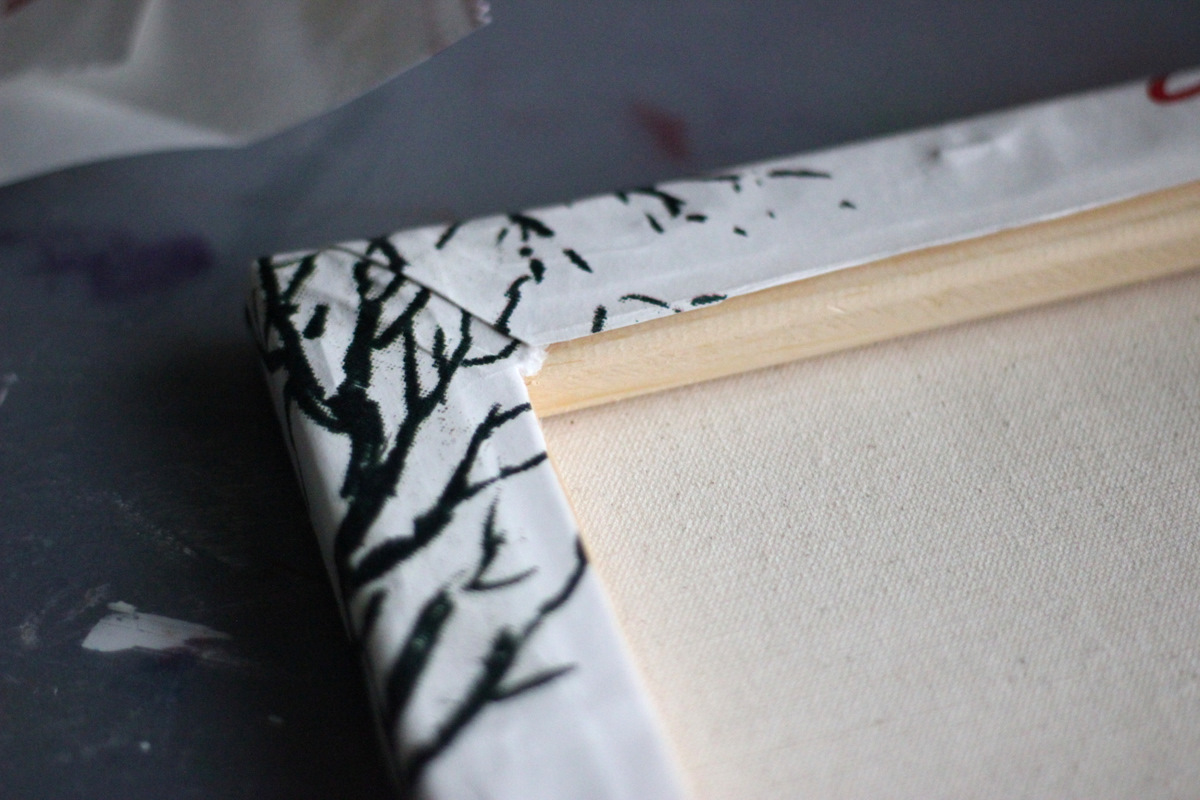
Paint mod-podge along sides of canvas, pressing paper to adhere as you go. I chose to fold the paper (much like you would wrap the end of a gift) on a diagonal and adhere to the inside edge of the wood frame, cutting any excess paper that would be hidden to prevent extra bulk.


Once you have adhered the sides, use the craft knife to neatly trim the paper at the edge of the frame.


(You can see in the image above that one side of the paper was shorter, as it didn't meet the edge of the wood. That side happened to be the top edge of the bag.)


Here's another image of folding the sides of the canvas. This was my second canvas, which had a different type of backing. There was a nice groove where the canvas met the frame, so I decided to trim the edge of the paper at the groove instead of covering all the wood on this canvas.


Here are the two different sized canvases. You can see more creases on the square canvas...definitely too much mod-podge on that one. I love how the different sizes seemed to create a different "story", given the parts of the illustration shown!


To embellish the illustration, I used a Martha Stewart ballpoint tip glue pen to highlight certain parts of the illustration, and then I covered the glue generously with glitter, tapping the edge of the canvas against the table afterwards to remove excess glitter.


I used the Martha Stewart crystal fine glitter for the snow on the ground, snow on the empty branches, and the birds. I used the aquamarine crystal to highlight the evergreen tree!


I attempted to use an embossing pen and some Rich Red embossing powder (I think made by Ranger) to heat emboss the Joy! on the page.


It was a bit difficult to get good coverage of the pen on the paper...and I got a little to close with the heat gun! But it was fun to experiment with it on one of the canvases anyway!

After dusting away any excess glitter with a fine edged paintbrush, I took the canvases outside and sprayed Superseal to protect the glitter and the surface of the print.


And here's the square finished canvas. (The other finished one is the first picture!)  I'm still trying to decide if I like the red writing in the top corner or if I'll add some pieces to disguise it and make the canvas more of a collage.  The jury is still out! :)

I hope you can turn some beautiful found objects around you into little pieces of art!  I am thinking I will try to do this each year...and soon have a small gallery of Christmas canvases!

Monday, December 19, 2011

The Kitchen Tree (and a project!)


So last year, we did some rearranging of rooms right before Christmas. (We switched Nathanael's room with the office and moved all our homeschool books, etc. to the new office/homeschool room instead of the kitchen, where we had been doing homeschool.)

For some reason, we decided to move our dining room table to the "homeschool area space" that had remained furnitureless for  2 years, leaving the former breakfast nook empty.  We dubbed the space the sunroom, because three walls of it have windows or faux french doors. (You can see this space in the picture below.)

I decided that it would look lovely to have a tree in the sunroom.  And it did look lovely.  I had big plans for the tree's decor...sliced & dried oranges, lemons, limes, starfruit. Garlands of cranberries and popcorn. 

Let's just say the tree only got lights. So this year, I promised Brent that I'd decorate it.  

So this year's Kitchen Tree:


The kid's made paper plate angels in Sunday School...Hadleigh's is on top of the tree.  Nathanael didn't want his on the tree...

And on December 8, we made Cinnamon Applesauce Ornaments...because they're fun and they smell sooooooo good.


Can't you tell it's fun work?  (They were so excited to use their rolling pins from they received from their Kammy and Pappy!)


We added Martha Stewart's Brownstone fine glitter to add a bit of sparkle.  And we used a straw to cut the holes to tie string through.  (Thanks to Aunt Katy & Uncle Alex, we had quite a choice of Christmas cookie cutters!)


Before they went into the oven...


And then after...the edges of some of the ornaments warped a little...but I think it's a nice effect!

There's still some time to make these and give as gifts for Christmas...and they will last for years!  A friend once made us a garland using gingerbread men!  I found that the more streamlined the cookie cutter, the better...sadly, our gingerbread men and snowflakes had a tendency to lose appendages!


Cinnamon Applesauce Ornaments

3 cups applesauce
3 cups ground cinnamon
1 oz. Elmers glue (I used one of those small 1.25 oz bottles)
glitter

1.  Mix all the ingredients together in a large bowl, adding more cinnamon to make the dough more firm if necessary.  Place on wax paper and roll out to about 1/4 inch thick.  If the dough is rolled too thin, the ornaments will break easily.

2.  Cut the dough with desired cookie cutters, remembering to cut a hole for threading.  I find that a straw works well, as the straw contains the removed portion and is a perfect size!

3. Carefully transfer ornaments to a cookie sheet.  I lined mine with parchment, which helps them not to stick, though the parchment warps a bit and caused the warping of some ornaments.  Bake at 150 degrees for one hour.  Then flip ornaments and cook an additional hour.  At this point, you can either 1) continue to bake them at a low temperature, elevating them on a drying rack so that both sides dry evenly or 2) remove them to finish drying on a counter, flipping every 8-12 hours (for about 2 days or until dry...you'll notice that the side facing down will appear darker than the other until it's completely dry.)  

4. When completely dry, use a butter knife to carefully smooth any rough spots along the edge of the ornaments.  Thread the whole with ribbon or twine to secure to your tree!

Enjoy!


Friday, December 02, 2011

My December Daily

Each year, since moving to Oklahoma, I have spent the month of December (as well as weeks afterwards) on a project that I love.  

The December Daily.  It's a mini-album concept made popular by Ali Edwards, which you can read about it detail on her blog.  But for me, this project ultimately means slowing down to really capture the special month of December...a month full of festivity, family, and the celebration of Christ's birth.  It has helped me in the past be more organized in planning our family activities during the Advent season. And it has captured and preserved precious memories from years past that I enjoy returning to each December.

The basic idea is to create a daily album before December begins so that each day in December, you can spend more time creating memories than creating album pages from scratch.  This year, I purchased a December kit from Hello, Forever, which included pages for the base of the album, as well as embellishments. 

I was inspired from some Pinterest images, as well as the colors in the kit, to use a vintage book as the cover for album...I was delighted to find this one for a song at a local antique/thrift store.  The colors and the "Merry Voices" title worked perfectly for a Christmas album cover, don't you think?


I covered part of the book with some mistable scalloped ribbon from Pink Paislee, misted it with Studio Calico's Mister Huey Shine (which you can't really see in the picture, but it has the softest shimmery effect in person), added a velvet ribbon and a "Dec 2011" badge from Ormolu.  I'm not in love with the 3" binder rings...but I think it will be the easiest binding to use while creating the album...and I'll attempt something else once it's complete.


I think I'll share pages here and there throughout the month...so here's a peek at the beginning, the title page. (And I'm not done with that tag yet...still thinking!)


And the back of the title page.  I just love that quote.

I have never completed this project in December...and while I'd love to this year, we'll just have to see how it goes.  I take pictures each day...and write down stories that I want to remember, so that I can return to my notes at a later time if necessary.

If you're doing something similar to record this month, please leave a link in the comments...I'd love to see your projects!


Thursday, July 28, 2011

Summer Fun Project

It's easy for me to get into a rut...the same things tend to fill even our days that don't have much routine.

So this week, we created a Summer Fun jar...a creative project for me to unwind...full of fun activities to help the kiddos expend some of their energy...and probably create more!

I used:

~ a mason jar
~ Classic Teal paint from Claudine Hellmuth Studio and white acrylic paint
~ leftovers from Jenni Hufford's fabulous mini-album kit she designed for Elle's Studio (you can see my album in the background)
~ alphas from Studio Calico's March kit, "Into the Woods"
~ some bakers twine and a few spare flowers I had laying around
~ a snippet of paper from Glitz paper layers

To begin, I was inspired (by this pin from my pinterest boards) to paint the inside of the mason jar.


It was quite easy...I mixed the teal and white paint until I achieved the shade I was looking for...spooned about a tablespoon or so of paint into the bottom of the jar, and then turned and tilted the jar until the paint had entirely coated the inside of the glass.  Towards the end, I placed a paper towel over a kitchen towel and gently tapped the jar (upside down) to finish coating some spots.  

Honestly, it took about 5 minutes to coat and then overnight to dry.  (I dried it for a few hours with the opening of the jar facing down over a paper towel, and then allowed it to dry with the opening up for the remainder of the night.  This way, there wasn't a ton of paint pooling on the bottom.)


The rest was simply figuring out which letter stickers I wanted to use and how to arrange them.  I centered my title, added a bit of bakers twine, and adhered the sweet Summer poem found on one of the Glitz papers. (Could the colors and sentiment be more perfect?)

I traced the lid on a sheet of patterned paper, cut it out, glued an Elle's Studio tag in the center, and added two flowers for good measure!  Then I adhered it to the lid.


And of course, the most important part: brainstorming activities to fill the jar with your children.  Some of our ideas included roller skating, snow cones, blowing bubbles, planting flowers, sidewalk chalk, getting gelato, running through the sprinklers, etc.

Oh, and "man building time" for building a wooden Anakin spaceship. Yep. That's my boy.  (and obviously a project that requires Daddy. Whew. Thank goodness for Daddy.)

After assembly, smile and enjoy your children's smiles each morning when they select an activity!
Sweet Summer, indeed!
 

© 2011. All Rights Reserved. | Prefab Blog Design By Penny Lane Designs