Monday, June 27, 2011

Missing this...


We spent some much-loved time on the East Coast at the end of May-beginning of June.  Asheville, NC followed by Savannah, GA (just the two of us) and then Kiawah Island, SC.  It was wonderful.  Lots of time with ALL of our family.  Mountain time. River time. Beach time.  Family time.  Anniversary time.

I'm having a hard time returning to routine.  And it's been two weeks now. Two busy weeks.  But I still don't feel like we're back to normal.  

I miss it.


I miss staring at the edge of the ocean.  Hearing the call of the sea.


I miss feeling the breeze in my face while boating.  Calling to the dolphins.


I miss the sand between my toes.  Searching for sea shells.


 I miss splashing in the water.  Well, at least watching my kiddos splash in the water.


I miss the peaceful stillness of the sunset.

I miss how life just slows to an easy pace.

How easy it is to see that the little moments are the big moments.

Life at the edge of the ocean is kind of like life on the mountaintop.

Instructive. Inspiring. Awe-filled. 

And so, I'm home...
pondering how to bring what's learned and loved from two of my favorite places back 
home to the wide, open plains of Oklahoma.

Which, of course, have a lesson to teach too.

Thursday, June 23, 2011

So excited to share...

On Monday, my little brother Matt asked Amanda to marry him!

We are thrilled...Amanda, we love you and are so excited that you and Rylie will be part of our family!


(I love this picture of the two of them, taken two years ago at Katy & Alex's rehearsal dinner...almost exactly two years to the day Matt proposed!)

Monday, June 20, 2011

Two Years


Happy Anniversary, Katy and Alex!

It's funny how children make you realize how much time has passed...here are a few more favorites of mine from your special day...


Wednesday, June 08, 2011

Still on the fence?

About this cookbook???  

If this post wasn't enough to convince you that you need it, maybe today will do the trick.

Grilled Chicken with Strawberry Feta Salsa
p. 135

Herbed Salmon with "Crowded House" Cucumber Salad
p. 126

Kentucky Derby Pie
p. 214

Herb and Goat Cheese Scrambled Eggs (over Ezekiel bread)
p. 223

Those are only the ones I took pictures of.

The Grilled Beef Filets with Blue Cheese Crust.  
The Shrimp Creole Risotto.  

Sigh.

Go.
Buy.
Cook.

Friday, June 03, 2011

Everyday Lunches

This is what lunch has looked like around here lately:

"Snack Lunches" as we like to call it for the kids. (Or PBJ's most other days.) And for the record, only Madeleine liked the dried fig.  They all devoured the dry mango though. And no wonder, it takes like candy.  (I'm trying to expand their dried fruit beyond raisins and cranberries.)


And a salad for me.  I could eat a whole avocado.  But I just eat half.  I love avocados.  Mmmm.


In the winter, I switch it up with grilled cheese, soups, or pastas occasionally.  

But I'd love to have some new ideas for summertime lunches...for the kiddos and for me.

So please, share some of your favorite ideas.  Link me up to an online recipe or site (or your blog) that you find helpful for new lunch ideas.

Please and thank you. 

:)

Wednesday, June 01, 2011

Who knew?

Brent is the Crème Brûlée maker of our family.  He does an amazing job...usually has one of the kiddos helping him...and he generally leaves the brûlée-ing to me.  What can I say? I love my cooking torch.

He never fails to ponder how something so icky as egg yolks could make such a delicious consistency when mixed with cream and sugar.  Who knew?  But I'm so glad that someone figured it out.  It's one of my most favorite desserts.

And the way Madeleine pronounces Crème Brûlée...it almost sounds like she's saying my name...or at least the version of my name as a few teachers of mine from middle school pronounced it. :)  (Kimbur- LAY...sigh.)  I digress...

Don't be intimidated...try it!  (And I highly recommend having a fine mesh-sieve to achieve a velvety texture.)  I bought my torch from Target (so it's not a super high-end expensive purchase)...and you can buy butane at most grocery stores or Wal-Mart.

Vanilla Crème Brûlée

2 cups heavy whipping cream
1/2 tsp. vanilla extract
8 large egg yolks
1/2 cup sugar
boiling water for water bath

1.  Preheat oven to 250 degrees.  Place egg yolks in a bowl and pour sugar over. Beat until smooth.
2. Heat heavy cream until almost simmering.
3.  Add heavy cream to yolk mixture 1 Tbsp. at a time while constantly stirring vigorously. (This is when having a helper comes in handy.)
4.  Once one-fourth of the heavy cream has been introduced, pour the rest in and mix until smooth.  Pour over a bowl through a fine-mesh sieve to strain any clumps.  Blend in vanilla extract.
5.  Pour into ramekins.  Place ramekins in a casserole dish or baking pan (with high sides).  Pour boiling water into pan, until water reaches halfway up the sides of the ramekins.
6.  Place pan in oven and cook at 250 degrees for 1 hour.  They are done when the outsides are set but the center is slightly jiggly. (Larger ramekins may need additional time.)
7. Cool until room temperature.
8. Wrap each cooled ramekin with plastic wrap, securing with a rubber band and allow to chill in refrigerator for 8 hours.
9.  Spoon sugar on top of custard in ramekin. Tilt the ramekin until the sugar completely covers the surface.  Ignite cooking torch and wave flame back and forth, about 3-4 inches from the sugar until golden brown.  Allow to cool slightly until sugar cools and forms a hard crust.

Friday, May 27, 2011

Compote Pincushion

A few months ago, I stumbled onto this picture over at Pinterest:


I loved the idea.  So very cute.  And I have a growing collection of decorative stick pins which come in handy for the linen pinboard that I made back in December. (Tutorial to come.)

So I decided to take some inspiration from this cute pincushion (in what I assume is a sweet little egg cup.)

My Mom and I went one weekend afternoon while she was visiting to a local thrift/antique store.  Within 5 minutes, I found a beautiful soft pink lidded compote.  I grabbed it.  But of course, I had to make sure I wasn't missing something better.  So we scoured the whole shop.  

There wasn't anything better suited for my project.

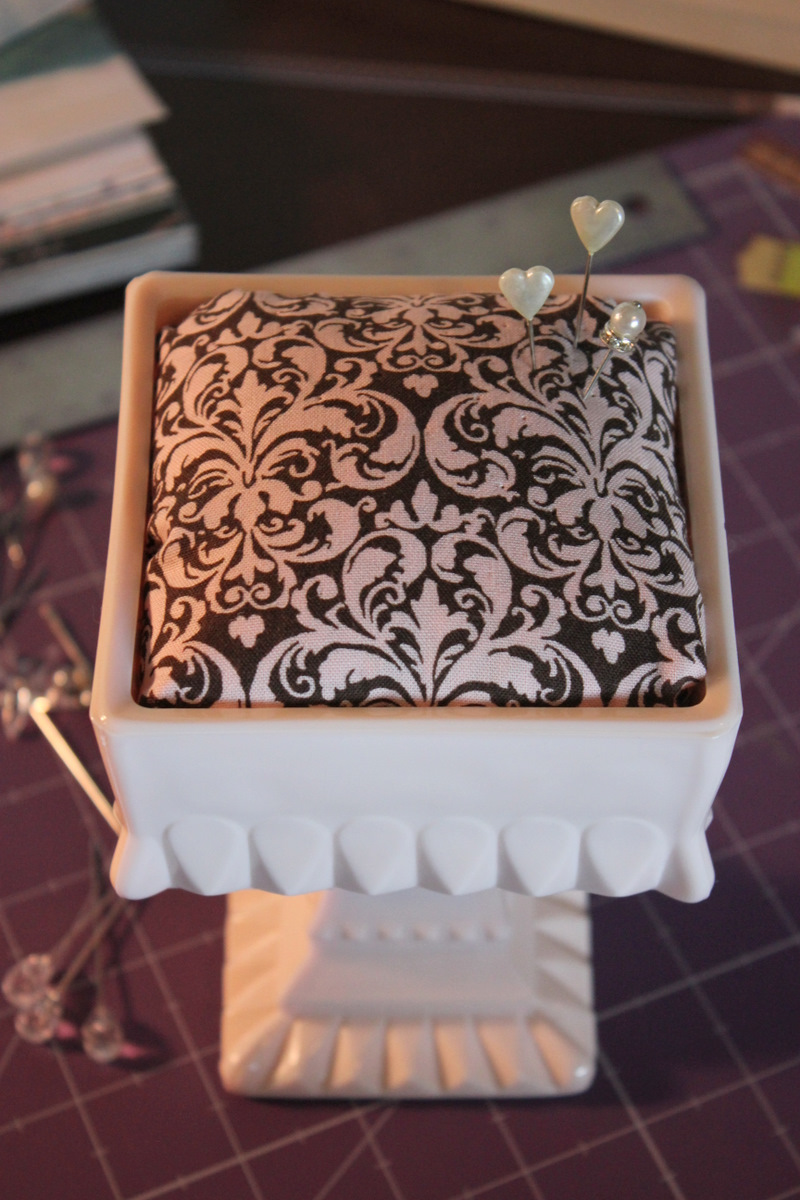
Isn't she lovely?


Granted, a little bit bigger than an egg cup...but I do have a lot of pins!
(You can see my pinboard in the background of the above picture.)

My next step was to find fabric.  And in my small town, that basically meant Hobby Lobby.  I picked three different patterns.  And once home, settled on a chocolate brown and soft pink damask.

I folded the fabric and stuck it in the compote to make sure I liked the total look.


So I began.

Materials needed:

Compote/egg cup/container for the base
Piece of fabric, size depends on your container. Mine was about 22x11 inches, folded into a square.
Square sheet of batting. (Mine was cut just slightly smaller than the fabric.)
Handful of loose Poly-Fil
Needle and thread and/or stick pins
Hot glue


1.  Lay fabric (cut to size) flat, right side facing down.  (Because of the thinness of my material, I folded it in half to make it more opaque. That's why the right side looks like it is up!)


2. Place sheet of batting over fabric and center Poly-fil on top.

3. Fold batting and fabric tightly over Poly-fil from top and bottom, to form a long rectangle.  Pin the fabric together and flip over carefully, so that you see the fabric on top.

4. If your fabric has a noticeable pattern repeat, choose the part you want centered in the "pillow." Then while taking care to keep the select spot centered, fold the open sides of the rectangle closed, to form a square.

5. Pin fabric closed and place in the compote to see the fit.  (below)


I found that it was a bit tedious to get all four sides with the same fullness, as evidenced above.  So, I fluffed and folded and fiddled with it until I was happy.


At this point, you could handstitch the fabric closed, if you so desire.  I found that my pins did a sufficient job holding it all together...and as naptime/quiet-time was over, the pins stayed put.  I love a project that doesn't necessitate needle and thread.  :)

Once the pillow is complete, you can use hot glue on the bottom and lower sides of the compote to make the pillow stay.  I found that with a square compote, the pillow was just slightly bigger than the opening, so it is securely "stuffed" in.  Additionally, I want the freedom to use the compote for other purposes (probably in the kitchen!) and wanted to ensure that I could go back and forth between uses easily.

I love pieces that multi-task!


If you have a round base for your pincushion, I recommend this tutorial.  And for more inspiration from the source of my inspiration pincushion, lookie here:  she has some other amazing pincushions and tons of great ideas on her blog!

Let me know if you try this out...I'd love to see your pictures!

Thursday, May 26, 2011

...ten...

Has it really been ten years?  

Since we walked down the aisle, hand in hand for the first time...husband and wife?

Nine...since we celebrated our first anniversary?
In Wilmington...and then France :)

Eight...since we counted down only 5 more months of just the two of us?

Seven...since we were just a family of three, realizing just how much we could love this little girl.
Falling in love again as we watched each other as parents.

Six...since we'd made our move to Texas...and looked forward to a baby boy. Wondered if it was possible to love another as much as we loved Hadleigh.

Five...happy...enjoying one another and our two little blessings.  Delighting in the difference between little girls and little boys. 

Four...anticipating another move, a new state, another sweet baby, building plans. Lots of changes on the horizon.

Three...since knowing our family was complete. Adjusting to a new stage of life. A new place in life.
(And thankful to be in our new home...finally...by our anniversary!)

Two...beginning the journey of homeschooling. Making date nights happen more frequently. Having fun together...just the two of us and as a family.

One...since our life in OK seemed more settled...and invested...and full. 

What a timeline.

So much has changed since that first day.
But then, so much is the same...and even better.

I love you, Brent. So very, very much.

Wednesday, May 25, 2011

Extra Special Breakfast

Crepes are a fairly normal breakfast option for our family on the weekends.  Brent (once again) is the crepe-maker of our family.  

For Mother's Day though, he went a little above our regular crepe recipe and fruit sauce to make these...and they were delicious.  I think the strawberry sauce (from step 4) is the extra special step here, as well as the fresh mint from our garden...I'll admit that I cleaned my plate, as did the rest of those sitting at our table.

And how gorgeous would these be for the 4th of July?  I'm thinking of renaming them Red, White, & Blue Crepes!

Strawberry & Blueberry Crepes

1/2 cup cold water
1/2 cup cold milk
2 eggs
1 cup flour
1/4 tsp. salt
2 Tbsp. butter, melted
8 oz. cream cheese, softened
1 cup sour cream
1/3 cup confectioner's sugar
1 cup fresh strawberries
1/4 cup sugar
2.5 cups lightly sweetened hulled strawberries and blueberries
whipped cream and fresh mint leaves for garnish

1.  Process the water, milk, eggs, flour, salt, and melted butter in a blender until smooth.  Chill for 2-3 hours.
2.  Heat a lightly oiled skillet or crepe pan.  Pour 3-4 tablespoons of batter into the pan.  Tilt the pan to form a 6-inch crepe.  Cook until light brown on the bottom and then remove to a wire rack to cool.  Repeat with remaining batter.
3.  Beat the cream cheese, sour cream, and confectioners sugar in a bowl with an electric mixer until smooth.
4.  Crush 1 cup strawberries with the 1/4 cup sugar in a bowl.  Stir until the sugar dissolves.
5.  Spoon 3-4 tablespoons of the cream cheese mixture onto each crepe.  Roll up and place seam side down in a baking pan.  Bake the filled crepes at 350 degrees for 5-7 minutes.
6.  To assemble, place 2 crepes on each plate. Spoon strawberry mixture over the crepes. Then sprinkle generously (about 1/2 cup each) with the strawberries and blueberries. Top with whipped cream and garnish with mint.

Serves 8.

Tuesday, May 24, 2011

More Projects on my Summer Fun List

via Pinterest, of course.

The kiddos would love this one...i'm thinking one side girly and the other side tough and boy-ish.

My college computer chair has had a very long life...and it's time.  TIme for a bit of a facelift. Now, I'm in search of the perfect fabric...

 via

This would keep the little ones entertained for at least an hour. (Note to self...buy more painters tape.)
 via

For any and all vacations, what a great idea!
 via

Oh boy.  This is going to be a hit.  And not just with the boy!
 via

How cute is this?  Right up Hadleigh's alley.
And if you don't want to make it, click through the link to see where you can purchase on etsy!

Any fun projects on your list you'd care to share? Please do!
 

© 2011. All Rights Reserved. | Prefab Blog Design By Penny Lane Designs